What are Window Services?
Windows services are executable applications that run in background. They are controlled by Service Control Manager(SCM). They can be started and stopped manually or it can also be done automatically . A service can run without any user being logged on to the computer. Typically, Windows services start when the Microsoft Windows operating system is booted and runs in the background as long as Windows is running. Usually a windows service doesn’t have any interface for the user interaction but this is not any rule, you can implement windows service with an interface if you want to.
Basic Requirements
Two classes are required for implementing window services.
1. System.ServiceProcess.ServiceBase : The ServiceBase Class provides many important methods like:
- OnStart: This method is called by Service Control Manager when your service is started.
- OnStop: This method is called by Service control manager when your service is stopped.
- OnPause: This method is called when your service is paused.
- OnContinue: This method is called when your service resumes after being paused.
- OnShutdown: This method is called when the system is shutting down.
2. System.Configuration.Install.Installer: The ServiceBase class has following properties:
- AutoLog: This is a Boolean property. States whether the service should write to the event or log on common events such as Install and Start. Set true if service is allowed to log entry.
- CanHandlePowerEvent: This is a Boolean property. It is set to true if the service should be notified of a change in the power status of the system on which the service is being executed.
- CanHandleSessionChange: This is set to true if your service need to handle Session change.
- CanPauseAndContinue:This is a boolean property that is true if the service can be paused and then restarted, false otherwise.
- CanShutdown: This is a boolean property that is true if the service wants to be notified that the system on which it is being executed is being shutdown, false otherwise.
- CanStop:This is a boolean property that is true if the service can be stopped, false otherwise
Installation of Service
Windows service can not be debugged directly. They need an installer to install the windows service. There is an Installer Class which is used for this purpose. The Installer Class provides the foundation for custom installations. This is the base class for all custom installers in .NET framework. It helps install applications on a computer.
Lets Understand this with an Example
For the basic idea of windows service lets implement a File Watcher Service. When this service is started, it monitors a Folder constantly whose path is specified. This service writes an entry to a file whenever any file or folder is created, deleted or renamed.
Step 1: To create a new windows service project open Visual studio and Click File menu ->New -> Project and select Visual C#-> Windows -> Windows Service Project type. Name this project as Watcher
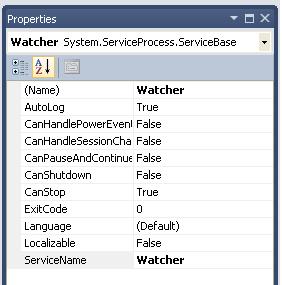
Step 2: Click designer to select service1.cs. (press F4) Then in properties window change the ServiceName and Name property to Watcher.
Step 3: Set AutoLog property to True.
Step 4: Open program.cs and edit the Main method to create an instance of Watcher.
/// <summary>
 /// The main entry point for the application.
 /// </summary>
 static void Main()
 {
     ServiceBase[] ServicesToRun;
     ServicesToRun = new ServiceBase[]
           {
                  new Watcher()
           };
     ServiceBase.Run(ServicesToRun);
 }
Step 5: Open service1.cs (by right clicking service1.cs and selecting View Code) to implement OnStart() and OnStop() methods. These methods are automatically overridden when you created the project. You can also override other methods like OnContinue(), OnPause() and OnShutdown().
public partial class Watcher : ServiceBase
 {

public Watcher()
     {
         InitializeComponent();
     }

     protected override void OnStart(string[] args)
     {
     }

    protected override void OnStop()
    {
    }
 }
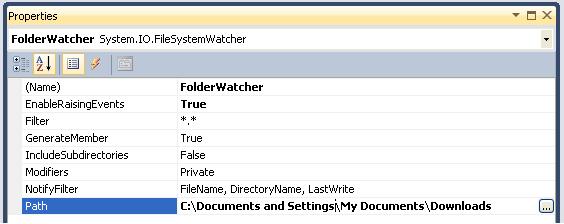
Step 6: Open service1.cs in design mode and from Toolbox select FileSystemWatcher control and set its name property to FolderWatcher.
Step 7: Go to FileSystemWatcher control’s properties and give the path of folder which needs to be monitered. Or you can set this path in app.config file of your project and specify this app.config path in OnStart event of your service.
Step 8: The FileSystemWatcher provides following events to be handled and these events are implemented in service1.cs class as shown below. I used the FolderLog.txt file which was created manually for storing the changes, but you can also create the file at service OnStart event (Just check if the file exists, if it exists use that file, if not then create a file and then use that one).
private void FolderWatcherTest_Created(object sender, System.IO.FileSystemEventArgs e)
 {
     TextWriter writer = new StreamWriter("D://WatcherLogFile/FolderLog.txt", true);
     writer.WriteLine(DateTime.Now + " A new folder/file with name " + e.Name + " has been created. ");
     writer.Close();
 }

 private void FolderWatcherTest_Deleted(object sender, System.IO.FileSystemEventArgs e)
 {
     TextWriter writer = new StreamWriter("D://WatcherLogFile/FolderLog.txt", true);
     writer.WriteLine(DateTime.Now + " A new folder/file with name " + e.Name + " has been deleted. ");
     writer.Close();
 }

 private void FolderWatcherTest_Renamed(object sender, System.IO.RenamedEventArgs e)
 {
     TextWriter writer = new StreamWriter("D://WatcherLogFile/FolderLog.txt", true);
     writer.WriteLine(DateTime.Now + " A new folder/file with name " + e.Name + " has been renamed. ");
     writer.Close();
 }
Here whenever any Folder/File is created, deleted or renamed in the specified target folder it writes an entry in a logfile using a Textwriter object.
Step 9: When installing windows service some custom actions need to be performed which can be done with help of Installer Class. Visual studio creates these installers for a window service and adds them to your project.
Creating Installer
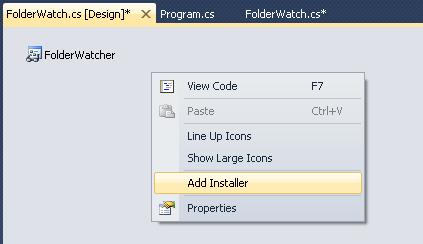
Step 1: Go to Service1.cs in designer mode .Right click and click Add Installers to add Installer Class.
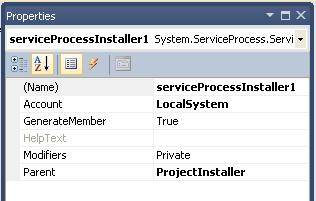
Step 2: When you click Add Installer visual studio creates ProjectInstaller.cs class and automatically adds two components to the class.
serviceProcessInstaller1
This is the installer for your service’s associated process.
serviceInstaller1
This is the installer for your service.
The most important property is Account within the ServiceProcessInstaller class. It specifies the Windows account under which the service runs (security context). The following options are available:
- LocalService: Service presents the computer’s credentials to remote servers.
- LocalSystem: Service presents anonymous credentials to remote servers.
- NetworkService: Service has limited local privileges and presents the computer’s credentials to remote servers.
- User: A local or network account is specified. You may specify the necessary username and password via properties, or you may type them during installation. The Service uses the security context of the specified user account.
Following three options are provided to specify how your service is started.
- Manual :- The user starts the service.
- Automatic :- The service starts automatically when the system starts.
- Disabled :- The service is not available for use.
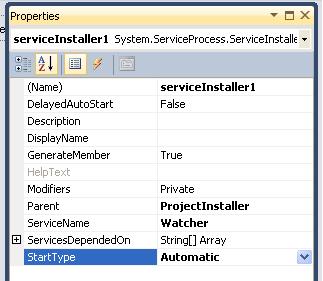
Step 3: Go to Properties of serviceInstaller1 class and set ServiceName to Watcher and StartType to Automatic.
Step 4:Go to Properties of serviceProcessInstaller1 and set Account property to LocalSystem. This causes the service to run on local system account.
Building Windows Service Project
1. Right click your project in solution explorer and click properties.
2. From Startup object list select Watcher.
3. Build your service from Build Menu and select Build Watcher or press Ctrl+Shift+B.
Installing Windows Service
1. Open Visual studio command prompt utility from Start->Programs.
2. Go to the Folder where your project’s executable (.exe) is present.
(Generally present in your working folder’s bin/debug folder)
3. Run installutil command to install your service:
Installutil MyService.exe
4. To Verify that your service is installed go to Run and type services.msc. press Enter. Find your service in services list.
Uninstalling Windows Service
1. Go to command prompt and run
Installutil /u MyService.exe
Instead of manually installing your service you can create a set up and deployement project for your service and create a .MSI package and install your service by running your .msi file.
So this was the basic of how to create a windows service. Keep exploring the possibilities…
Happy Coding….

[…] Midnight Cubicle " Useful tips from a developer's desk" HomeAbout ← Creating Windows Service in C# […]
Pretty part of content. I simply stumbled upon your blog and in accession capital to say that I get in fact loved account your blog posts.
Any way I will be subscribing to your augment and even I fulfillment you access constantly
rapidly.
Thank you for some other informative blog. The place else could I am getting that type of information
written in such an ideal way? I’ve a undertaking that I’m simply now operating
on, and I’ve been on the glance out for such information.
Piece of writing writing is also a fun, if you be acquainted with afterward you
can write or else it is difficult to write.
Thanks! Perfect for filling in my knowledge gap quickly. 🙂
I have developed and install the service but when i start the service it gives “Error 1075: The dependency service does not exist or marked for deletion”